Categories
PC Guides Web Guides

The Differences between a browser plug-in and browser extension

There are billions of computers in the world connecting to the internet each day. Something which is common with almost of all these irrespective of where they connect to the internet from, all they need is a browser to use the web services. When it comes to browsers, there are a lot of aspects which people actually fail to understand. This could because of a wide variety of reasons. Anyways, something most of which people mistake is in identifying the differences between a browser plug-in and browser extension. So, for all you enthusiasts, this article will help understand what  a plug-in is and what an extension is.

The Differences between a browser plug-in and browser extension

Differences Between A Browser Plug-in and Browser Extension:

To understand the difference between these two high-end terms, lets go through each of them separately; carefully walking through what each of them is capable of and what they can’t.

Browser Plug-in:

Just before a few years, the earlier versions of HTML couldn’t actually deliver all stuff like videos, music and images; like the HTML versions today. So to add additional features to your browser, you were to manually add pieces of software which could process them. These are called the browser plug-ins. These plug-ins actually attach to particular web pages using tags like <embed> or <object>.

These are the additional features your browser is embedded with. A Plug-in never interferes with your browser and operates only in the space that is allotted to it within the webpage.

For example, users may download the Adobe Flash Player plug-in to view interactive videos and images present on the webpage.

Some of the other famous browsers are the Apple Quicktime player, Adobe Reader, Macromedia Flash etc.

Browser Extension:

Adding extensions or ‘add on’ to your browser means extending it; you may look at it as adding more powers to what your browser already has. This is under your control and picking one or not is totally up to you. But if you do, they become a part of your browser itself (not really the webpage). Some stuff a typical browser can do is:

  • Create toolbars.
  • Affect Browser Menus
  • Control Tabs and WebPages, etc.

The Google Voice Extension for Google Chrome is the best example for a browser’ add on’ or browser extension.

These are what Plug-ins and extension mean; hope you could clearly understand what are the differences between a browser plug-in and browser extension!

Categories
PC Guides

5 Interesting Facts About Computers You Probably Don’t Know Of

Without doubt, we live in a world of computers. These machines for long now have been reducing human labour and making lives simpler and simpler.

As per definition, computer is a device which has the ability to perform arithmetic and logic operations automatically. This is something many of us know, but there are lots of amazing and interesting facts about all these silicon devices.

So here are few such interesting facts about computers for you.

#1. Charles Babbage, known as father of computers invented the first computer (mechanical) which in no means looks similar to your laptops or desktops. But anyways programmable computing started with him.

5 Interesting Facts About Computers You Probably Don't Know Of

The early electronic computers which came out in the 1940s, were of the size of large rooms and even they are vastly different than today’s computers.

#2. Though you do a lot of stuff with your computers say run games, movies, software etc. All of them result from your computer’s ability to perform small instructions which include adding numbers and moving data between places. That’s it!

5 Interesting Facts About Computers You Probably Don't Know Of

Simply a few millions of such small instructions result your web browsers, video players, word processors etc.

#3. The modern computers are being built with transistors in form of integrated chips. But if someone were to connect each transistor individually (almost impossible), then we have it our ancestral room-sized computer!

5 Interesting Facts About Computers You Probably Don't Know Of

#4. Computers are not just machines which can help you write documents, surf web; they can even help you wash clothes (as in washing machines), cook food (as in microwaves).

5 Interesting Facts About Computers You Probably Don't Know Of

The only difference is the processors present in such electronic goods are capable of performing only one specific task. It surely isn’t the case with our laptops or desktops.

#5. The circuitry in computers is very sensitive, so much so that static electricity is sufficient to destroy it.

5 Interesting Facts About Computers You Probably Don't Know Of

So before you put your hands into the case of your computer next time, keep this in mind.

Categories
PC Hacks

How to backup your data using File History in Windows

File History update is a Windows 7 feature , which was not well known and therefore very few people used it. This tool provides a user interface which is easy to access and has more features and was designed to create backup copies of previous versions of your files and important data . So that if something goes wrong, you have multiple versions to restore. Users who are familiar with the application known as ” Time Machine ” developed for Mac, Apple will recognize this concept immediately. However, this program has been introduced in Windows 2003, but then had a more basic form.

Steps To Backup Your Data Using File History :

Step 1 : Open Control Panel :

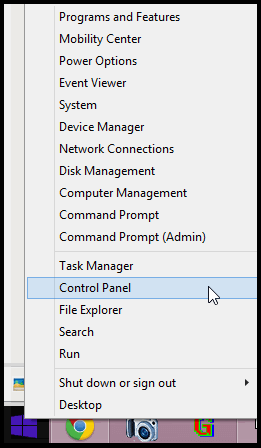
Move your mouse to the top right corner of the screen and click on Search. Now type ” Control Panel ” and hit enter.

How to backup your data using File History in Windows

Step 2 : Save Copy Option :

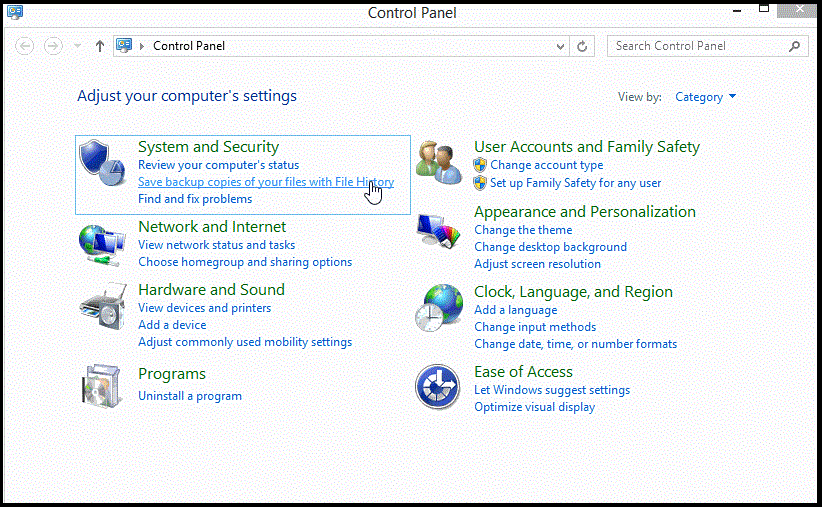
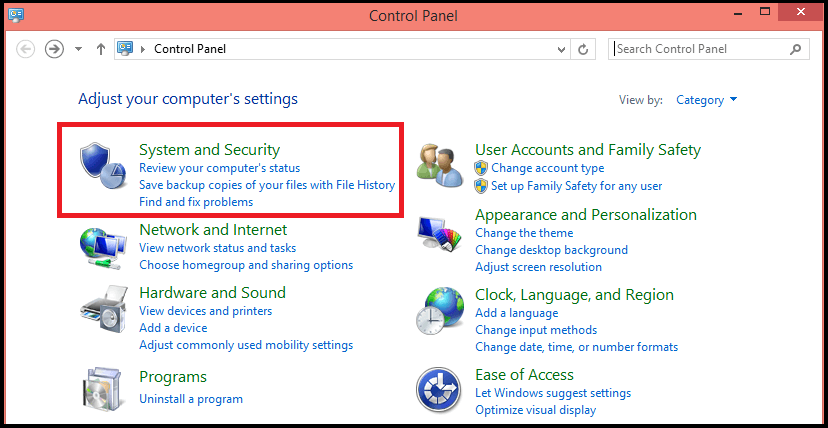
In the Control Panel, Click on the ” Save copies of your files with File History ” option located under the ” System and Security ” section .

How to backup your data using File History in Windows

Step 3 : Enable ” File History ” :

To enable ” File History ” connect an external storage device (such as a USB stick), Windows will automatically detect and configure the location of file history storage; or go to a network folder you want to use for this purpose.

How to backup your data using File History in Windows

Step 4 : Restore :

To restore files, click on the ” Restore personal files ” option located on the left side of the main screen of file history. Then a user friendly interface to navigate recovery files will appear. Simply go to the folder where your file is stored and use the arrow at the bottom of the screen to move forward and backward in time. When you find the file you’re looking for, just right-click on it to view all previous before pressing the big green button that lets you restore the version you want.

How to backup your data using File History in Windows

Step 5 : Set The File Backup Time Interval :

To increase the frequency with which Windows creates backups of your files, just click on the “Advanced Settings” to the right of the Windows File History tab. Now change the setting of “Save copies of files ” as you need .

How to backup your data using File History in Windows

Step 6 : Offline Files :

To access offline files, check the options of history files in the Advanced Setup window. This is ideal for people who travel because when you’re away from the source where you store your backups (eg when you’re traveling with your laptop), you work on the files to be stored on the local formal when you’re back, are synchronized with the location of your backups.

How to backup your data using File History in Windows

Step 7  : Exclude Folders :

If you want exclude a specific folder from automatic creation of backups, click on the ” Exclude Folders ” option on the left of the main window of the file history .

How to backup your data using File History in Windows

Categories
PC Hacks Security

How To Control The User Login Time In Your Computer

Having control over an administrator account allows you to do certain things, and also you will have the administrator privileges on the system, which gives you an extra advantage over all other users on the system. It is very easy to control the user’s log in time in that system by using command prompt . When a deadline for a particular user is established, the user can only access the system in that particular period .

Steps To Control The User Login Time :

Step 1 : Open Command Prompt : 

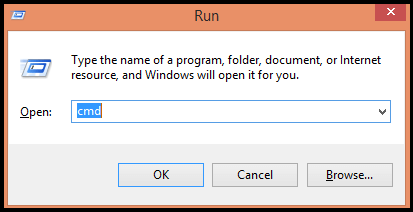
You open it by just simply entering ” cmd ” in your window’s search box Or press ” Windows + R ” ( Run dialog box will be displayed ) and type “  cmd  ” in it .

How To Control The User Login Time In Your Computer

Step 2 : Use Syntax :

” net user ” is the syntax to set the login time.

  • Type in ” net user Username /time:M-F,06:30-21:00 ” .This is the syntax to set the login times for a week .How To Control The User Login Time In Your Computer
  • Replace the word username with any registered username on your computer. This means that the selected user has access to his account ; Monday- Friday from 8:00 a.m. – 9:00 p.m .How To Control The User Login Time In Your Computer
  • Hit enter.

Step 3 : Specifying Different Times Daily :

You can also use the below given form for specifying different times daily.

  • Go to the command prompt as shown above.
  • Enter ” net user Username /time:M,6am-12pm;T,3pm-9pm;W-F,4am-1pm “. This method allows you to set the allocation to the user in different ways for each day. You can do the same by simply entering the day, followed by a comma , and the time range , and a semicolon .How To Control The User Login Time In Your Computer

Tips :

  • You can specify the time in military format as 18:00-24: 00 or you can also use the standard time format as 6:00 am – 9:00 pm .
  • If you want to have a user with complete login time for every day of the week, then simply write the syntax like: ” net user Username /time:all ” .
Categories
Web Guides

Everything You Need To Know About Internet Ports

Using the internet is so much fun, but there are a lot of concepts which make it what it is. One such important concept is the IP Address and follows it is the ports concept.

Well anyways for a normal internet user, there is no necessity in understanding these because your web browser takes care of all this, but for you enthusiasts; this article on ports will walk you through what ports mean and your knowledge levels of the internet’s functioning are sure to boost a step further.

What are Ports, anyway?

Just like a hardware port helps connect devices to your computer, every computer on the internet connects to the other through a port. These ports are numbered based on their functionality and for programming purposes. And the most common ports are from 0 to 1023 are reserved for internet.

ports

Since IP Address provides unique identification to all computers within the internet, ports provide efficient and non-interfering data transfer. There are two different types of ports and they operate in two different methods: TCP and UDP.

What TCP means?

Transmission Control Protocol (TCP), like already mentioned is a method in which the computers connect to each other over the internet. In this method, the two computers are connected directly with each other. The computer which is sending the information stays connected with to the recipient computer until the data transfer is completed and then the connection is closed.

This method is much efficient and reliable to the User Datagram Protocol (UDP) in which there is no guarantee of the data being received at the destination; but this isn’t the case with the TCP method. Anyway, both TCP and UDP ports are used.

Now that you are already aware that your computer’s identity on the internet is determined by its IP Address, now let us look at what happens then after.

As your computer is to accept information it is being sent from, say a web server, it does it via one of its UDP or TCP ports.

If you are uncomfortable in understanding what ports are, don’t worry it really is too technical. But to simplify things for you, here is a real life example you can relate all the jargon you have read about till now.

You can look at it more like, your T.Vs cable connection. First the operator has to uniquely identify your device with its serial number and sends you cable. Now it’s upon you to select a channel among the lot based on show you want to watch. So here the serial number of your cable set is analogous to IP Address and the channel you choose for watching your desired show is the port, the cable is the TCP or UDP.

Right now your IP Address is associated with over a 65,000+ UDP and another 65,000+ TCP ports. And one among them is port 80 – the Hypertext Transfer Protocol, port 25 – for mails (Simple Mail Transfer Protocol), port 20 and 21 for FTP (File Transfer Protocol) server application and so forth. All such prominent services have their ports assigned with particular numbers and this is the port number by the Internet Assigned Numbers Authority (IANA).

Like mentioned earlier, there are port numbers from 0 to 65535; of which 0 to 1023 are reserved for privileged services also called the ‘well-known ports’. The ports from 1024 to 49151 are ports which can be registered by any software corporations. And the ports from 49152 to 65535 are private and can be used by just about anyone.

Should you bother about Ports and Port Numbers?

Like we have started off with this point, you don’t really have to worry if these ports work properly or not. The processing of all these port numbers is taken care of by the network hardware and software. The real thing is you wouldn’t even come across them while using your network features. But it is purely to build your knowledge about how internet and ultimately computers work.


Categories
Web Guides

Open Port 25 To Fix The Simple Mail Transfer Protocol ( SMTP ) Problem

The Port 25 is the port used to send emails. Ports can be opened or closed on your computer for security reasons. If port 25 is closed on your computer, you can not send emails. So if you are having any problem in sending e-mails , Then you need to open port 25 .

Steps To Open Port 25 :

Step 1: Open Control Panel :

Open Port 25 ?

Click on Start button and select Control Panel. Now Move on to ” System and Security Section ” and click on ” Windows Firewall ” option. Now click on the ” Advanced Settings ” which is located in the right side of the page.

Open Port 25 ?

Open Port 25 ?

Step 2 : Inbound Rules :

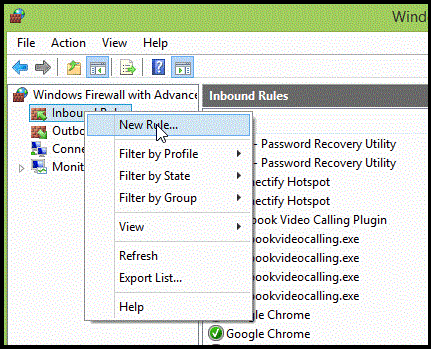
Now Right-Click On The ” Inbound Rules ” ( located on the left sidebar ) and Select ” New Rule ” Option .

Open Port 25 ?

Step 3 : Select The Port Option :

Mark the radio button next to the ” Port option ” in the window titled ” Types of Rules “. Now Click Next.

Open Port 25 ?

Step 4 : TCP And Specific Local Ports :

Select the ” TCP ” and ” Specific Local Ports ” options. Enter the port number 25 in the given text box and click Next.

Open Port 25 ?

Step 5 : Select The Action :

Select the action that the network must take when a program attempts to access the port 25. Select ” Allow the connection if it is secure ” option to allow only authentic connections. Click Next.

Open Port 25 ?

Step 6 : Select The Type Of Connection :

Check the boxes of the types of connections you want to have access to port 25. Domain , Private or Public are activated by default. Disables the boxes if you want and then click Next.

Open Port 25 ?

Step 7 : Assign A Name :

Enter a name for the rule. It can be something as Open Port 25 . Type the name into text box labeled Name . Now you can find this new rule in the list of Inbound Rules. Click the Finish button.

Tips :

  • To test if port 25 is open or closed, click the Start button and type ‘ ipconfig ‘. Now type ‘ telnet mail.domain.com 25 ‘ and replace the area of the domain name by your Internet service provider and press Enter. If port 25 is closed, you will see a connection error.
  • Many Internet service providers block port 25 and send emails on the other port. That can add greater security. Generally spam emails are sent in bulk to port 25. To combat this , Many service providers blocked access to port 25.
Categories
PC Guides Web Guides

How To Check The Performance Of Your Network And Internet connections

Did you just connect your PC to a network or Internet ? Want to know the easiest way to check, if you are connected properly or not ? The ” ping ” and ” tracert ” command will help you to do so. These commands measure the latency, also known as ” lag ” of your connection.

Steps To Check The Performance Of Your Network And Internet connections :

Step 1 : Open Command Prompt ( CMD ) :

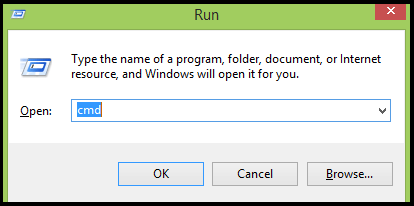
To open your command prompt , just Press ” Windows key + R ” and type ” cmd ” in the displayed Run dialog box . Now press Enter to open the ” command console “.

How To Check The Performance Of Your Network And Internet connections

Step 2 : Check your loop-back address :

  • Enter ping ” 127.0.0.1 ” ( it is same on all computers, so do not worry ). This checks the network chip of your computer and not the modem, router or your Internet connection.How To Check The Performance Of Your Network And Internet connections
  • Press ‘ Enter ‘ to begin the ping.
  • Place ” -t ” at the end of the line for this test continuously.
  • To stop checking the ping press ” Ctrl + C “.
  • Write ” -n 20 ” at the end of the line for 20 consecutive pings. You can replace the number 20 with any number of ping you want to do (But the value must be a valid integer 32 bit or 64 bit).
  • If all goes well, Look at the statistics of ping. It should reflect ” 0% loss “.
  • Check response latency, as it represents the time it takes for information to travel from the server to your computer. The digits under 100 are very good. The latency varies greatly depending upon where the server is in relation to your computer. Normally, most connections should have a latency of a few hundred milliseconds. In-case, If there is no network connection you will see a message like ” Request time out ” repeated several times.

Step 3 : Check your gateway :

Find the IP address ( Public IP Address ) of your default gateway:

How To Check The Performance Of Your Network And Internet connections

  • Type ” ipconfig ” in the Command Prompt and Press Enter .
  • Now Command Prompt will display the results of the ipconfig command.
  • Find the numbers under ” Default Gateway “. This is the IP address you can use to check the connection between your computer and your router or ISP.

Step 4 : Now check beyond your local network :

Check the connectivity of your router,modem, LAN, or Internet connection using an Internet IP address.

How To Check The Performance Of Your Network And Internet connections

Step 5 : Check the IP address of a website :

Instead of typing an IP address, type the name of a website such as ” www.onlinecmag.com “. When you ping a domain name, you also will see your computer’s ability to resolve the IP addresses of Internet domains ( find the number of the IP address using the domain name ).

How To Check The Performance Of Your Network And Internet connections

Step 6 : Check the performance of your network and Internet :

This Is only For Windows NT, 2000, XP, Vista and 7 Users. Use the ” tracert ” command to measure the response of each element involved in the network. Your connection to a server requires many ” hops ” between servers and other network components. The fewer hops on the path, the better. Most connections to a server including at least a dozen jumps.

To check this follow the below steps :

How To Check The Performance Of Your Network And Internet connections

  • In the command prompt type ” tracert zzz.zzz.zzz.zzz “, replace zzz.zzz.zzz.zzz with the internet IP address.
  • Press Enter and watch the ping checks each jump. The first ping should be your computer, then the modem or router, and the last ping should be the address to which you want to reach.
  • Check how the response time to more distant points is greater than the closest places.
Categories
PC Guides

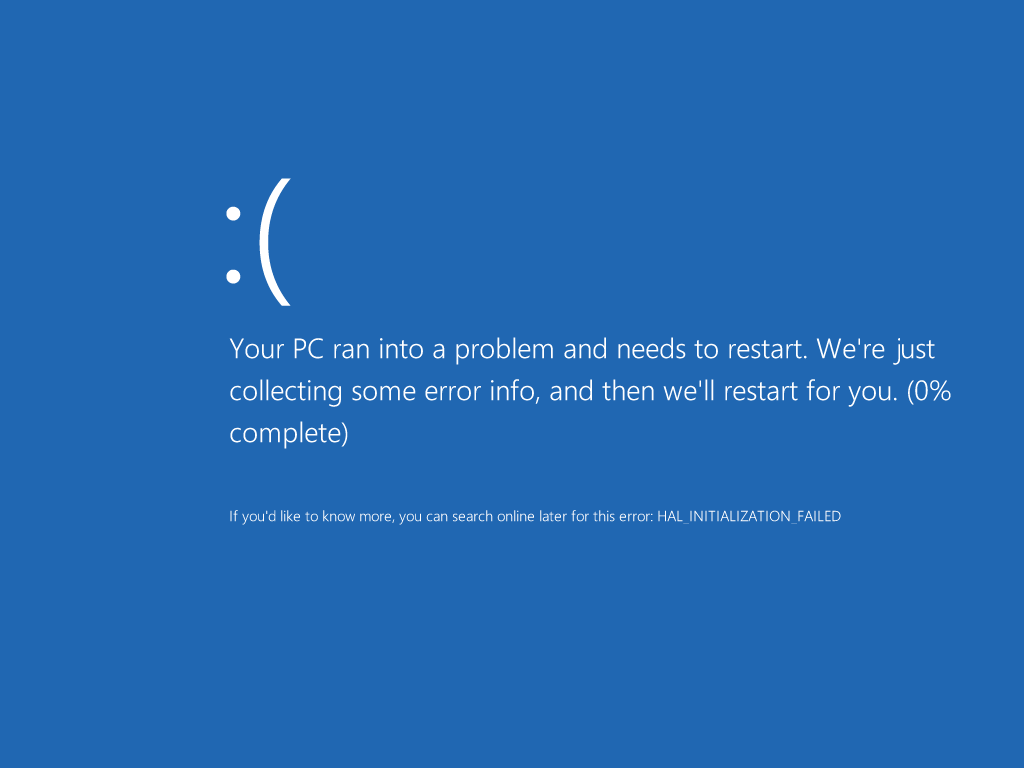
What Do You Think Blue Screen of Death (BSoD) is?

If you are using any of the Windows operating system, chances are that you encountered a blue screen with white words and then all you can do is reboot your computer.

Everything About the Blue Screen of Death (BSoD)

If it hasn’t happened with you, that’s really good and we wish it doesn’t happen any sooner as well. But if you see it quite often, its better to take few measures. Anyway in this article we walk you through a lot of fancy stuff about this General Protection Fault (GPF) error which is commonly called the ‘Blue Screen of Death’ error.

The Blue Screen of Death

BSoD: The Consequences

This error message or the error screen is usually generated by the operating system itself when there is an unexpected error, which is beyond its scope. At this instant the operating system is all powerless and gets abruptly terminated. In many cases it is also accompanied with loss of work. The Blue Screen of Death error is considered to be the worst among the errors computers usually experience. And there is every reason you shouldn’t expect it!

BSoD: The Causes

The BSoD is generated in case of software crashes or during some hardware issues. Generally, the software which users use aren’t so capable of leading to a BSoD but the lapses in driver software could provoke such drastic consequences.

Though our computers encounter several application crashes overtime but none of them are so intense that they could bring the operating system down along with them.

This blue screen is displayed when there is a ‘stop message’ windows receives. This error causes the windows to crash; though the programs can’t save data, even under such critical situation the windows operating systems manage to create a file and write to it the information of the crash. This information is very important in pin-pointing the cause of such massive crash, and provides a good lead in troubleshooting them later.

Bottom Line:

A computer in the most ideal condition shouldn’t go blue, but mistakes do happen and nothing is perfect. These errors are so common and can strike any computer anywhere. Even Bill Gates, the chairman of Microsoft had his share of experience with the Blue Screen of Death error in a public demonstration of the Windows 98, luckily he had a spare computer with him.!

If your computer displays a Blue Screen of Death message once in a blue-moon you shouldn’t be worried that alright, but if it happens much often you have got a problem.